About Fedena

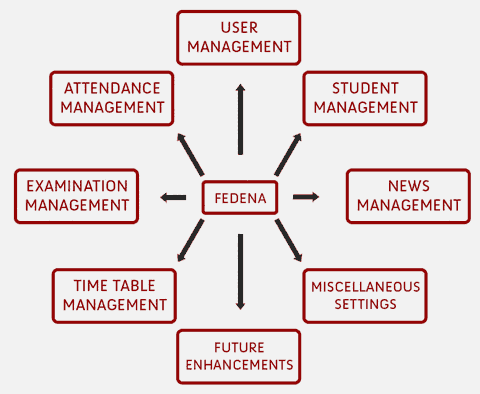
Fedena is an open source project developed on Ruby and Rails for school management. The project was initially developed by a south Indian company named “Foradian Technologies” and is currently maintained by the open source community. Anyone can participate in the project by accessing the code on Github and contribute to the project. With an area for students and one for teachers, the Fedena provides the necessary tools for managing schedules, lessons, assessments, students and tasks such as the admission of new students or creation of a new academic year. The list of features is quite wide and it can gather more extendable through plugins available on the market place.
You can try their demo website by visiting the below link.
Installing Fedena
Like Moodle, the installation of fedena is very simple. We recommend you to set up a latest version of Ubuntu VPS for installing Fedena, it will help you to avoid a ruby gem compatibility issue. This tutorial is based on Ubuntu 14.04 and it is available to most of the VPS service providers.
http://releases.ubuntu.com/14.04.1/ubuntu-14.04.1-server-amd64.iso
If you are not familiar with Linux command line, we can help you to set up Fedena for you http://www.serveradminz.com .
As I mentioned earlier Fedena is based on RoR (Ruby on Rails) framework.
1.) So, first you need to update the system package list and then install Ruby dependencies.
(Need root privilege)
sudoapt-get update
sudoapt-get install git-core curl zlib1g-dev build-essential libssl-dev libreadline-devlibyaml-dev libsqlite3-dev sqlite3 libxml2-dev libxslt1-dev libcurl4-openssl-dev python-software-properties
2.) After the installation of ruby dependencies, we are now going to install Ruby programing environment using Ruby Version Manager (RVM) (need root privilege)
sudoapt-get install libgdbm-dev libncurses5-dev automake libtool bisonlibffi-dev
3.) Create a user for fedena (Please note that the most of the steps do not require root user privilege except for installing packages withsudo.) (need root privilege)
adduser fedena
Enter the details ask on the screen;
Username: fedena
Password: enter a strong password and note downitEtc..
4.) Login as “fedena” user and follow the below steps to install Ruby as fedna user.
curl-L https://get.rvm.io | bash -s stable
If you get the below error, try to add the gpg using command mentioned in error report and try the above command again.
Downloading
https://github.com/wayneeseguin/rvm/archive/1.26.10.tar.gz
Downloading
https://github.com/wayneeseguin/rvm/releases/download/1.26.10/1.26.10.tar.gz.asc
gpg: Signature made Monday, 02 February 2015 09:39:00 PM IST using RSA key ID BF04FF17
gpg: Can’t check signature: public key not found
Warning, RVM 1.26.0 introduces signed releases and automated check of signatures when GPG software found.
Assuming you trust Michal Papis import thempapispublic key (downloading the signatures).
GPG signature verification failed for ‘/home/fedena/.rvm/archives/rvm-1.26.10.tgz’ – ‘https://github.com/wayneeseguin/rvm/releases/download/1.26.10/1.26.10.tar.gz.asc’!
Try downloading the signatures:
gpg–keyserver hkp://keys.gnupg.net –recv-keys 409B6B1796C275462A1703113804BB82D39DC0E3
orif it fails:
Command curls -SSL https://rvm.io/mpapis.asc | gpg –import-
The key can be compared with:
https://rvm.io/mpapis.asc
https://keybase.io/mpapis
Before proceeding you must confirm this message printed on the terminal.
In
stallingRVM to /home/fedena/.rvm/
AddingrvmPATH line to /home/fedena/.profile /home/fedena/.mkshrc/home/fedena/.bashrc/home/fedena/.zshrc.
Addingrvmloading line to /home/fedena/.profile /home/fedena/.bash_profile /home/fedena/.zlogin.
Installation of RVM in /home/fedena/.rvm/ is almost complete:
source~/.rvm/scripts/rvm
echo”source ~/.rvm/scripts/rvm” >> ~/.bashrc
sudo adduser fedena sudo
Before proceeding to below step, you need to add “fedena” user to sudoers file. Otherwise, you will get an error like below.
fedena is not in the sudoers file. This incident will be reported.
sudoadduser<username>sudo
sudo adduser fedena sudo
rvminstall 1.8.7
rvmuse 1.8.7 –default
ruby-v
The last command should display the current ruby version as 1.8.7
5.) Then we need to install Rails framework using below command
geminstall rails -v 2.3.5
Note: RubyGems is a package management framework for Ruby.
The gem command is used to build, upload, download, and install Gem packages.
6.) The next step is to setup database for Fedena, for this we need tosetupmysql server (need root privilege).
sudoapt-get install libmysqlclient-dev mysql-server
Important: Do remember the mysql password you set during this step, it is required later.
7.) Like installing Moodle, we can use git to clone the fedna installation files from the github code hosting service.
gitclone https://github.com/projectfedena/fedena.git
8.) Setup your database details in the database.yml
Open the file database.ymlin the config folder of the fedena soucre. Change the following details:
database: fedena – The name of the database you want to use for fedena
Username: root – Mysql username for fedena
Password: mypass – The password for the above mysql user
9.) Install the rest of the gems
gem uninstall -i ~/.rvm/gems/ruby-1.8.7-head@global rake
gem install rake -v 0.8.7
gem install declarative_authorization -v 0.5.1
gem install i18n -v 0.4.2
gem install mysql
gem install rush -v 0.6.8
gem update –system 1.3.7
10.) From the Fedena source directory in terminal run,
rakedb:create
rake db:migrate
followed by,
rake fedena:plugins:install_all
11.) Set up pdf settings (need root privilege)
sudo apt-get install wkhtmltopdf
cd config/initializers
cp wicked_pdf.rb.example wicked_pdf.rb
Now open wicked_pdf.rbusingvieditor
viwicked_pdf.rb
and change change :
wkhtmltopdf => ‘/opt/wkhtmltopdf’, to :wkhtmltopdf => ‘/usr/bin/wkhtmltopdf’
then save the file.
Note : wkhtmltopdf and wkhtmltoimage are open source (LGPL) command line tools to render HTML into PDF and various image formats using the QT Webkit rendering engine. These run entirely “headless” and do not require a display or display service.
12.) Setup Email and SMS alert
cd config
cp smtp_settings.yml.example smtp_settings.yml
vi smtp_settings.yml
SMS
cd config
vi sms_settings.yml
Add your settings and save the file
13.) Change permissions for scripts (Important)
From the same directory grant executable permissions for the files in script directory by,
chmod +x script/*
14.) Finally run the inbuilt server
If everything went fine till now, you are ready to run fedena server by running the following from fedena source folder,
script/server


Leave A Comment
You must be logged in to post a comment.